Some boards number each line of their minutes so that members can point to an exact spot when they propose a correction ("page 2, line 14"). MuniMins does not add line numbers itself, but Microsoft Word can add them to your exported minutes in a few clicks.
Step 1: Download the Minutes as a Word Document
Open the minutes in MuniMins. If your organization uses export templates, choose one from the drop-down, then click Download DOCX. Open the downloaded file in Microsoft Word.
Line numbers need the desktop version of Word, on Windows or Mac.
Step 2: Turn On Line Numbers
- In Word, click the Layout tab.
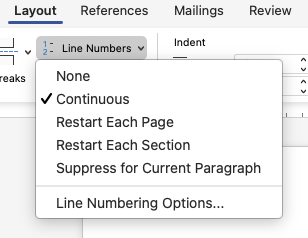
- Click Line Numbers.
- Choose how the lines are numbered:
- Continuous — numbers run from the first line of the document to the last.
- Restart Each Page — numbering starts again at 1 on every page. Choose this if your board refers to corrections by page and line.
- Restart Each Section — numbering starts again at each section break.
The numbers appear in the left margin. Word shows them only in Print Layout view, so if you don't see them, click the View tab and choose Print Layout.
Adjusting the Numbering
- Number every fifth or tenth line. Click Layout, then Line Numbers, then Line Numbering Options. In the window that opens, click the Line Numbers button and change Count by to 5 or 10. You can also change the starting number and how far the numbers sit from the text.
- Skip a paragraph. Click in the paragraph you don't want numbered, such as the title or the signature lines, then choose Line Numbers and Suppress for Current Paragraph.
- Remove the numbers. Choose Line Numbers, then None.
Sharing the Numbered Minutes
Line numbers print with the document. To send the board a copy that everyone sees the same way, save it as a PDF from Word: click File, then Save As (or Save a Copy), and choose PDF as the file type.
The line numbers live in the Word file, not in MuniMins. If you edit the minutes in MuniMins and download them again, turn the line numbers on again in the new file.